Leaves on My Knockout Roses Look Funny
By the end of every fall I find myself swearing off roses. But at the beginning of every summer to follow, they suck me back in.
The promise of gorgeous flowers and carpets of petals, and the delectably tedious art of pruning, makes the headaches over diseases that commonly affect these plants tolerable.
At least until the end of fall, that is. Then I give up on them again.
But such is the life of the gardener.
We link to vendors to help you find relevant products. If you buy from one of our links, we may earn a commission .
Few plants in the garden offer the refined payout that roses do. From their iconic flowers to their euphoric aromas, roses are a mainstay for a reason.
But this comes at the price of requiring lots of attention to detail in terms of plant health and care.
If you grow roses, you're almost guaranteed to encounter disease.
Seasoned experts and eager amateurs alike are going to encounter black spot, mosaic, and mildew growing on their roses at one point or another.

Let's take a look at these common and likely problems you'll discover, and learn how to address them. But first, we'll go over a few basics on disease prevention.
Here's an overview of what I'll cover:
What You'll Learn
- Tips for Preventing Disease
- Rose Diseases
- Black Spot
- Rust
- Powdery Mildew
- Botrytis Blight
- Cankers
- Crown Gall
- Rose Rosette
Tips for Preventing Disease
Roses want full sun conditions and lots of airflow. They also thrive on being doted on, so regular pruning and removal of dead tissue will help minimize the risk of disease.
Hey, roses are a lot like us, aren't they?
Try planting disease-resistant cultivars to start with, to reduce the likelihood of infectious encounters.
I have never been a fan of Knock Out® Roses myself, but they are a popular series because they are generally highly resistant to disease.
Chemical Solutions
Always follow the directions on the label of any chemical solution you use in your garden!
Too much or too high of a dosage is just as bad, or sometimes many times worse, than applying too small of a dosage. Always refer to the label when using any chemical.
On the same note, if you find a strange tip on the internet or in conversation with a fellow gardener, do a little research before following through with it.
As much as I'm a fan of old school gardening techniques, I find too much of this is fluffy nonsense.
Keep Those Pruners Clean 'n' Sharp
I sharpen my pruners every single morning, and if I'm doing a lot of snipping, I'll bring the whetstone with me to the jobsite.
A sharp blade makes a clean cut, and clean cuts minimize damage to a plant while simultaneously helping to prevent infections.
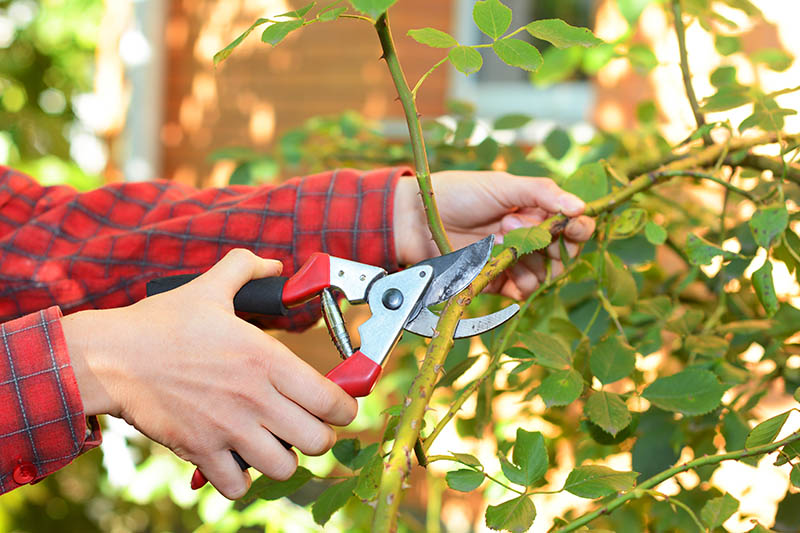
Many rose diseases easily spread to other plants, oftentimes from a gardener's pruners.
I carry a spray bottle filled with rubbing alcohol and spritz my pruners between every plant I prune, or sometimes between every few cuts on the same plant.
It's tedious and annoying, but it's vital to plant health.
Rose Diseases
These are some of the more common rose diseases the home gardener will encounter.
I've listed them in ascending order of severity, with the really nasty ones at the end.
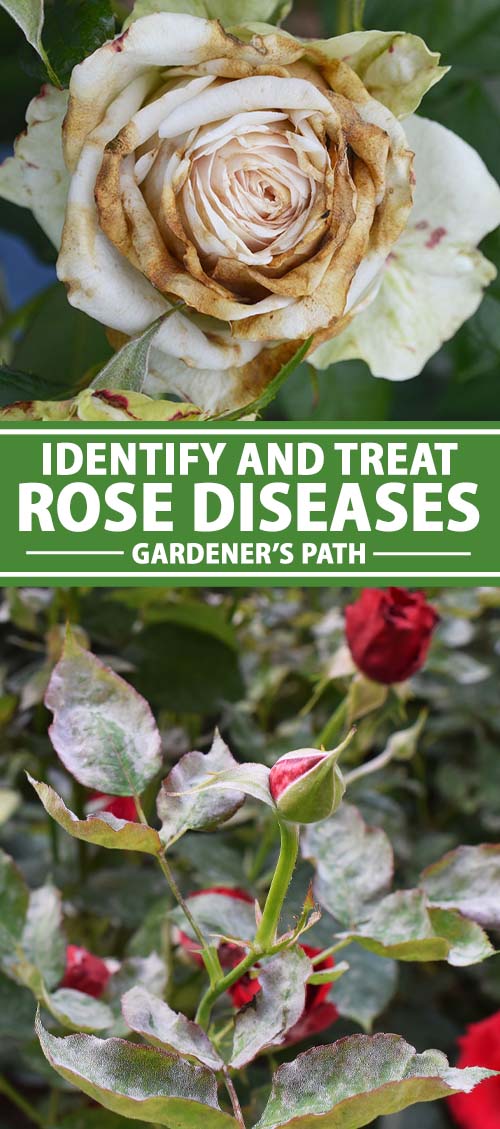
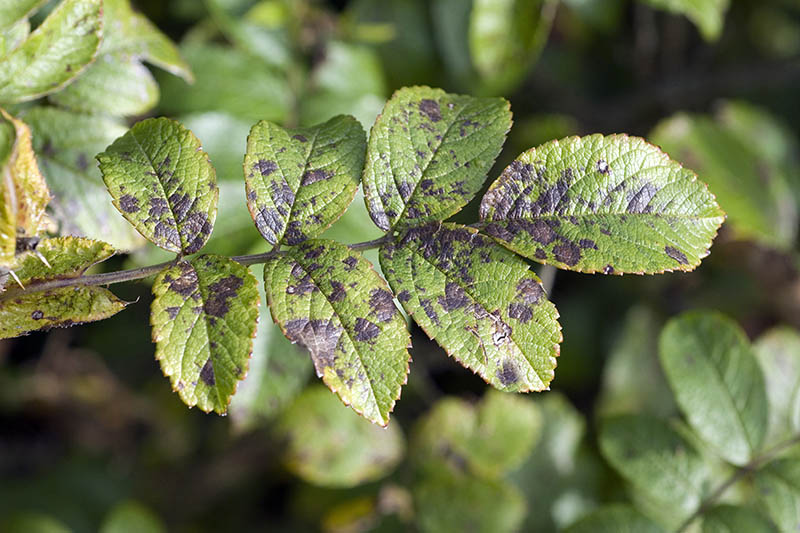
Black Spot
One of the most common rose diseases you'll encounter is black spot.
Caused by the fungus Diplocarpon rosae, black spot will defoliate and weaken your plants, making them more vulnerable to other environmental pressures.
Think of black spot as a gateway disease; it is unlikely to kill your roses by itself, but it stresses your plants and makes them more susceptible to other infections.
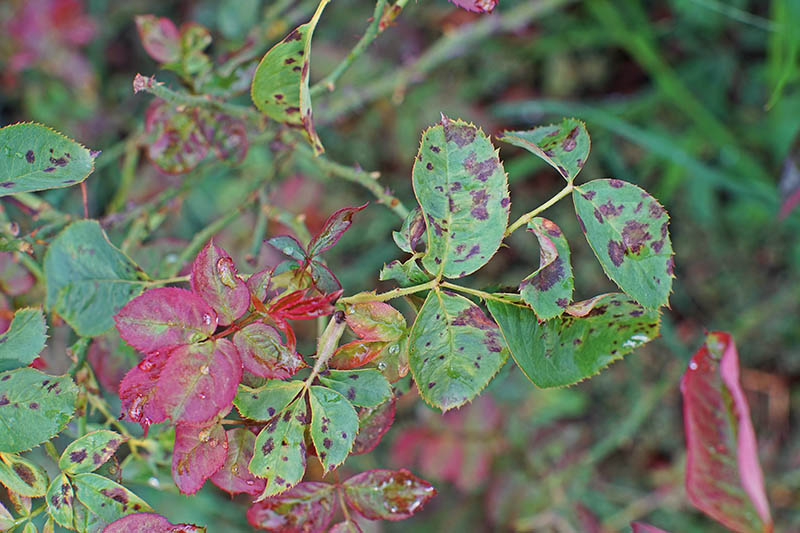
This fungal issue is often encountered in the spring and fall, when conditions are wet and cool nights prevent moisture from evaporating.
Warm weather over about 80°F/26°C tends to prevent black spot from occurring in the first place, and dry weather inhibits the progress of this disease.

Water splashing on infected leaves is what spreads the fungus, so a lack of precipitation and unnecessary irrigation means minimal spread of infection!
Black spot often begins its damage at the base of the plant and works its way to the top.
Infected leaves will develop a telling bunch of black spots before the plant drops these leaves.
Infected canes will look bruised and take on a black or purple hue, indicating the presence of infection.
The fungus overwinters in infected leaves and canes, so if your plants have it one year, it's likely to make an appearance again in the future.
How to Handle Black Spot
Black spot can be treated with a few different types of sprays. However, this is a very difficult disease to handle once an infection sets in, so early care is vital.
A mixture of about a teaspoon of baking soda with a quart of warm water can be sprayed on the plants, or you can use a sulfur-based fungicidal spray.
I started using this product from Southern Ag last fall, and found the results promising. It's available on Amazon.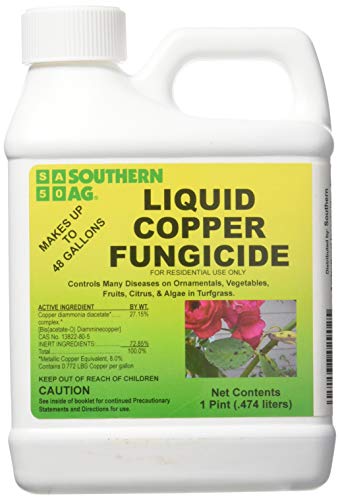
Liquid Copper Fungicide
Neem oil can also work, but I tend to avoid it when working with roses to prevent causing harm to beneficial insects.
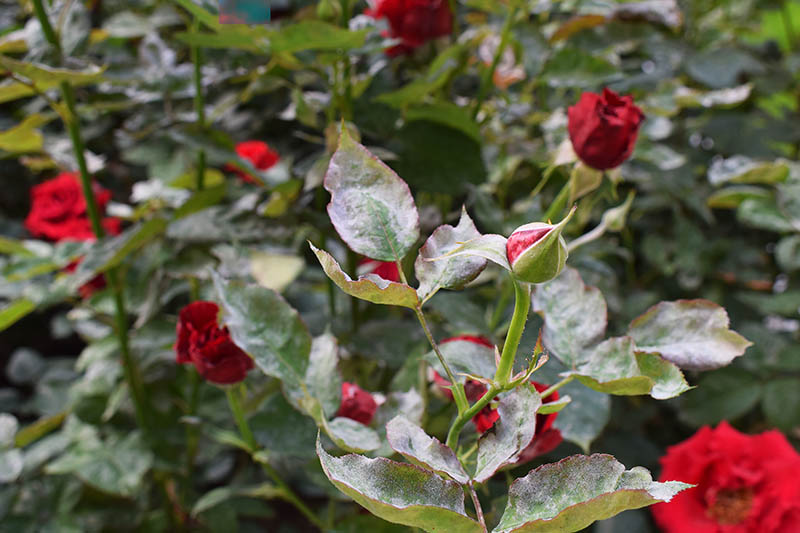
Rust
A common problem caused by nine different species of fungus, at its most benign, rust is an ugly condition.
But in the worst cases, it will kill the initial host plant and spread to the others.
It's relatively easy to spot rust on your roses.
They'll often drop leaves, and the condition is obvious with its orange, rust-colored marks that appear on leaves and canes. In the winter, infected canes tend to turn black.
Rust overwinters in infected tissue, but it can also find a safe hiding spot on trellises and fences, or just about any place near the host rose where it is offered some protection from the worst of the winter weather.
Luckily, this fungal issue is specific to roses, so it should only pose a potential threat to the other roses in your garden.
Handling Rust
As is the case with many plant diseases, a thorough and attentive watering regimen is key to solving your rust issues.
Remove fallen leaves every autumn and as an early spring cleanup project to help minimize the spread of this fungal disease.
If you're in the planning stage of your garden design, consider purchasing rust-resistant rose varieties to dramatically minimize your chances of encountering this annoying problem.
If you opt for chemical control, consider using Bayer Advanced Disease Control instead of a combination fungicide and insecticide.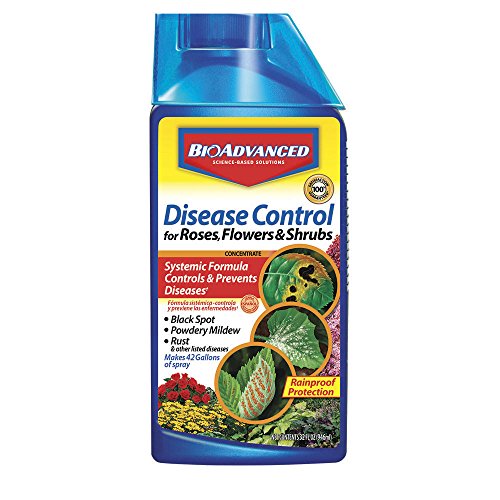
Bayer Advanced Disease Control for Roses
This is a reliable and readily available over-the-counter choice, and you can find it on Amazon.
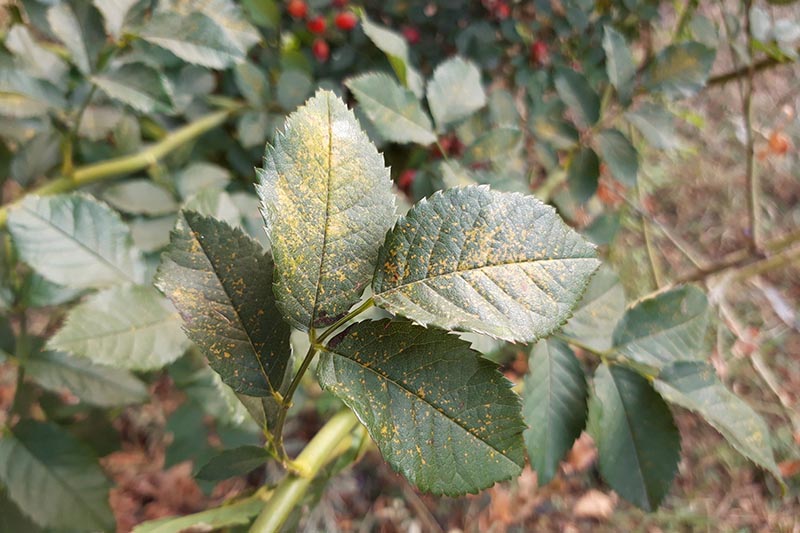
Powdery Mildew
If you're growing roses, you've probably encountered powdery mildew before. It leaves a telltale… well, powdery mildew on the leaves, a gray coating that screams "yuck!"
It's commonly spotted in a variety of plants in the garden, and becomes an almost constant annoyance in late summer and early fall.
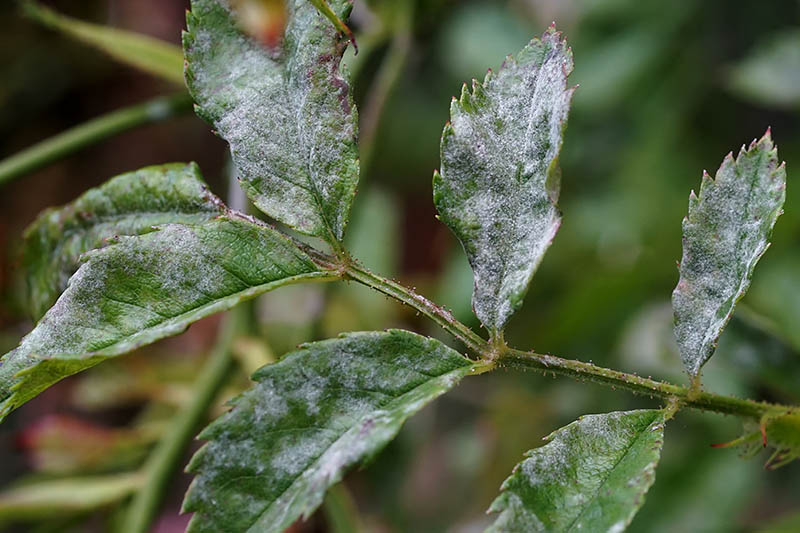
This fungal disease thrives in humid conditions where airflow is minimal or nonexistent. Sounds like every summer day in Philadelphia, if you ask me!
However, it can also thrive in dry conditions, and that's what makes powdery mildew such a headache. You just never know when it's gonna strike.
If it's a minor case of powdery mildew, I tend to let it go unmended, but will pay close attention to infected pants to ensure the disease doesn't spread.
Oftentimes this is an issue that will take care of itself in minor cases.
A thorough fall cleanup of all shed leaves is a helpful trick to minimize any recurrences.
Handling Powdery Mildew
Either of the fungicides recommended for the previous fungal issues will help to treat powdery mildew.
Make sure you're spraying all parts of the plant, including the tops and bottoms of leaves, on a regular schedule.
Some experts recommend an application every two weeks, but as always, read the label of your purchased chemical for its suggested usage.
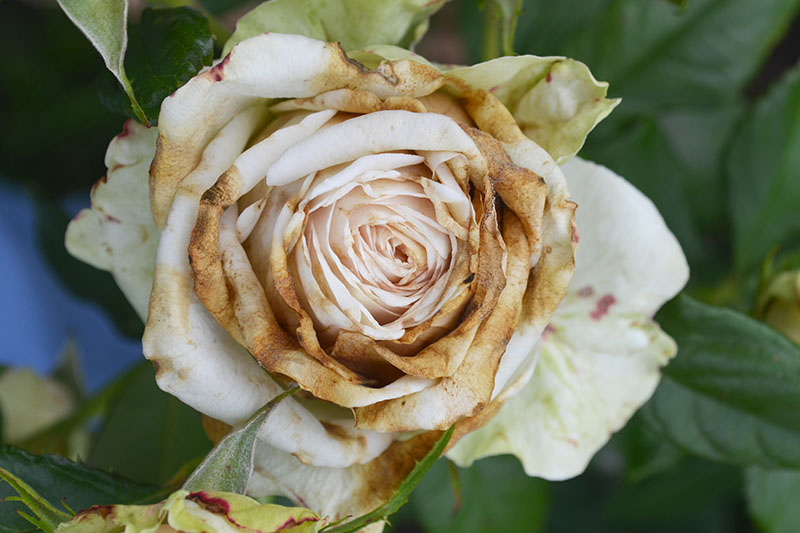
Botrytis Blight
I remember watching some tea roses expectantly, eager to see their developing buds blossom into the lovely flowers I've come to love (and detest, depending on what time of the year you ask me about it…) then furrowing my brow as the petals turned brown and crispy.
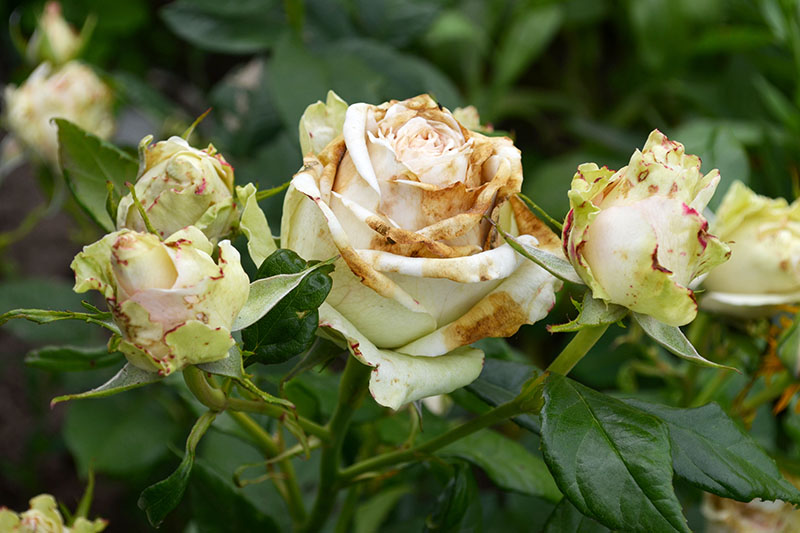
This was my first encounter with botrytis blight, an awful and ugly disease that most often attacks tea roses, ruining their blooms.
Like most fungal issues, this one is caused largely by environmental issues, so a hot and humid summer is the perfect breeding ground for this disease.
Handling Botrytis Blight
While botrytis blight can be controlled temporarily with fungicides, it often adapts a resistance to these sprays and makes them ineffective after prolonged use.
Sunny, dry weather is often enough to keep this condition under control.
An interesting solution to handling botrytis blight rests in your fertilization practices.
Too much nitrogen can create an abundance of new, soft growth that is overly susceptible to this blight.
Limit any midsummer feeding you provide to your roses to help minimize the risk of blight attacking that new growth.
Cankers
This one is an ugly, potentially fatal fungal infection for your roses.
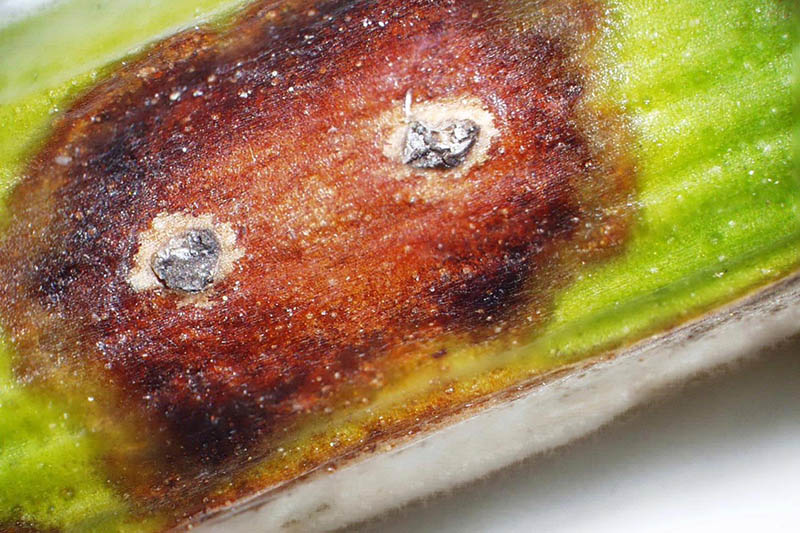
Canker reveals itself by turning the canes black, most notably in locations where the plant was recently pruned.
Always clean your pruners between different plants to prevent this from happening!
Interestingly, cankers often cause the most trouble during the colder periods of the year, making them a bit more difficult to notice than other diseases.
I've encountered them during early springtime pruning, either by discovering old cankers, or noticing new ones taking hold.
Roses are susceptible to three types of canker:
1. Brown Canker
You'll find tiny, raised, reddish-purple bumps on the canes, a little less than half the size of a grain of rice. As these little spots begin to mature into their fruiting bodies, they develop a brown or black color.
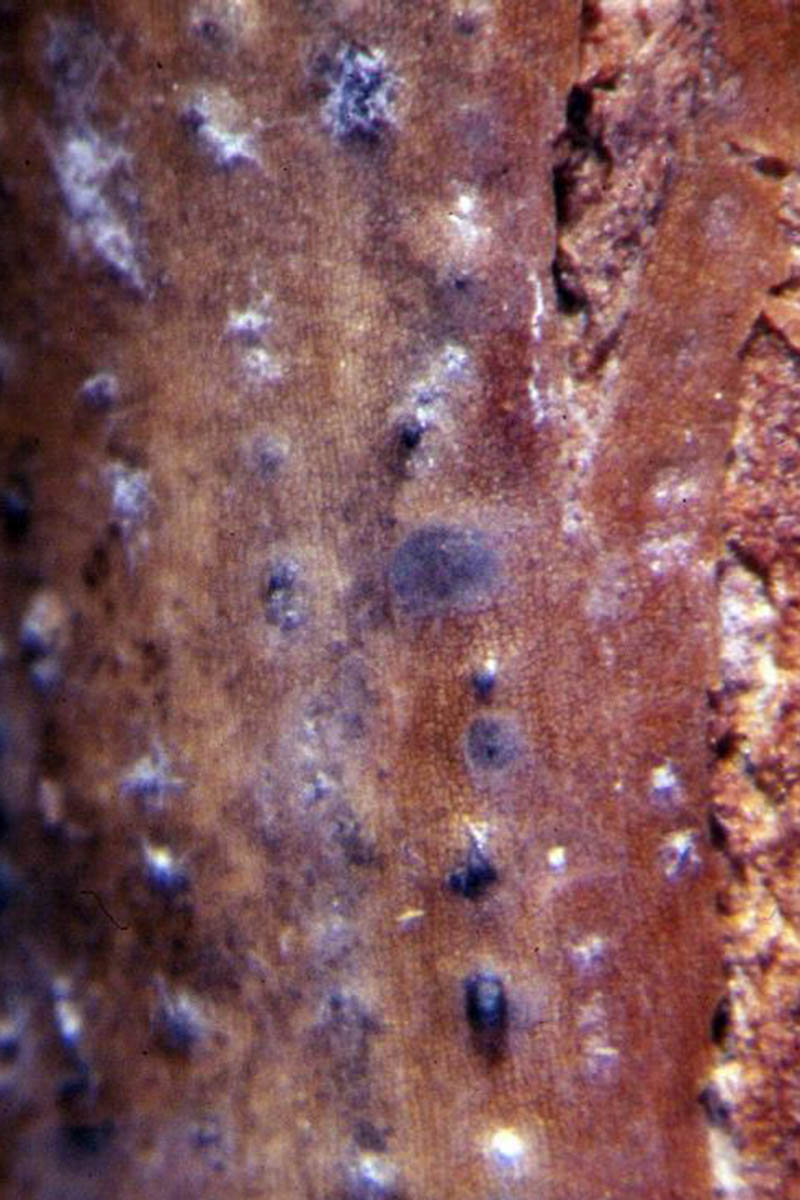
2. Brand Canker
These have a similar reddish color as the brown variety, also found on the canes, but these cankers quickly develop a brown center. I've yet to see a brand canker without that brown central coloration.
3. Stem Canker
Sometimes harder to spot at a glance than the others, stem canker tends to have a yellowish color, but it can also swing towards the red slice of the color wheel. This type of canker shows up on the bark.
Handling Cankers
Using clean, sharp pruners, remove the infected tissue and canes.
I've seen people cut two to three inches below the infected tissue, but I go farther than that if it's a widespread issue, sometimes removing 75% of an infected stem.
Cut into the healthy, green area of the plants, and follow up with a fungicidal treatment to give your roses an added boost against reinfection.
Preventing cankers is surprisingly easy: mulch their roots to prevent the plants from getting too cold in the winter, and make sure you provide adequate amounts of fertilizer.
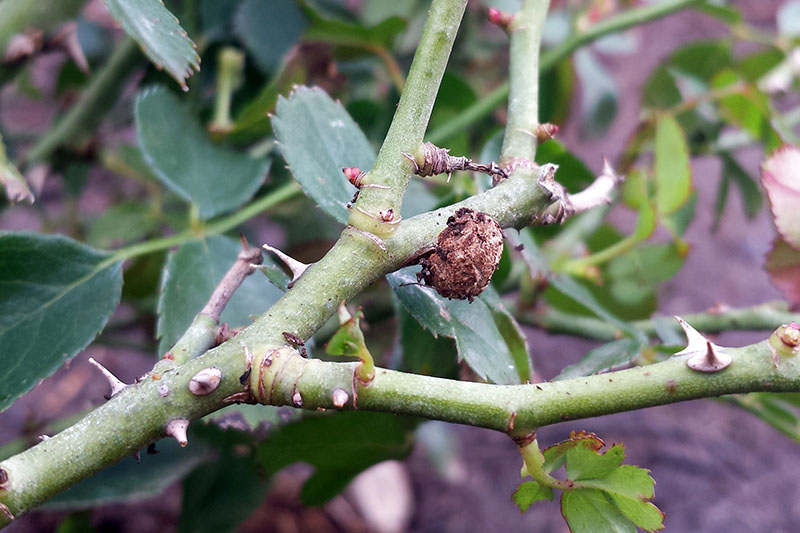
Crown Gall
As we've moved through this list, we've talked about rose diseases in order of their severity, so you know crown gall is serious business.
It's also one of the most easily identifiable of all rose diseases.
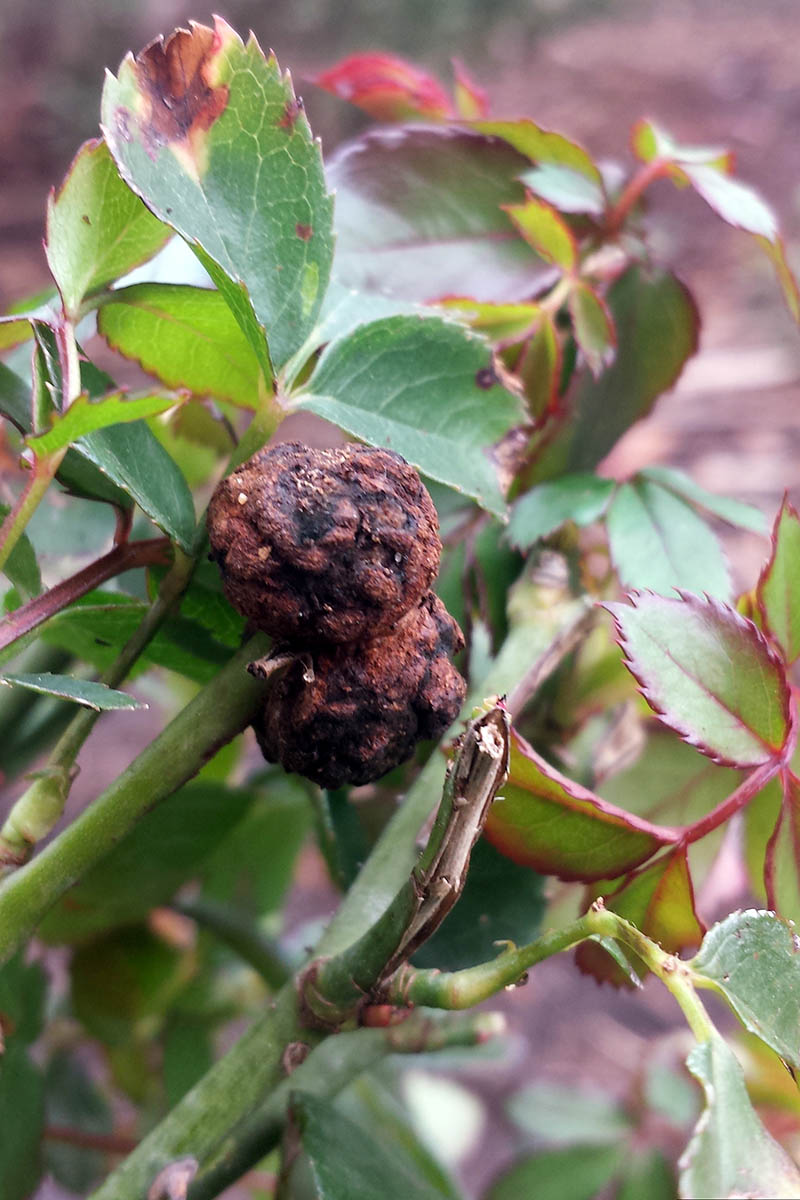
Crown gall is an ugly, weird-looking growth of tissue that looks like a mix between a brain, a praying mantis nest, and a head of cauliflower.
It can be a smaller mass of tissue or a larger one, and can occur almost anywhere on the rose, but it almost always develops near the soil level or crown of the plant.
It is caused by a bacterium (Agrobacterium tumefaciens, for the Latin lovers) that enters wounded tissue.
Though it's easy to identify once you spot it, most of the time, this disease is not noticed until weeks after the date of infection.
Handling Crown Gall
Well, this one is simultaneously easy and sad: remove the infected plant and destroy it, and do not plant another rose in this location for two years.
The goal here is to get rid of any residual bacteria in the soil, and any of the original rose's infected roots, before replanting in that area.
Treatments are available to slow the growth of a crown gall and to minimize its damage, but these efforts will not kill this infection.
Treatment only slows the progress of the disease and is not recommended.
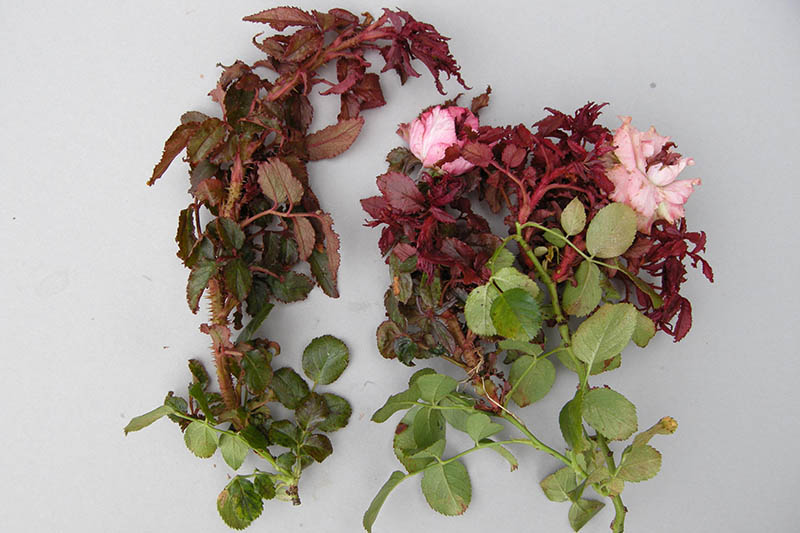
Rose Rosette
In my opinion, this is the saddest-looking disease a plant could possibly develop.
It's as if the physical traits of rose rosette disease were meant to twist and warp a rose just enough that it's still beautiful, but in a very ugly way.
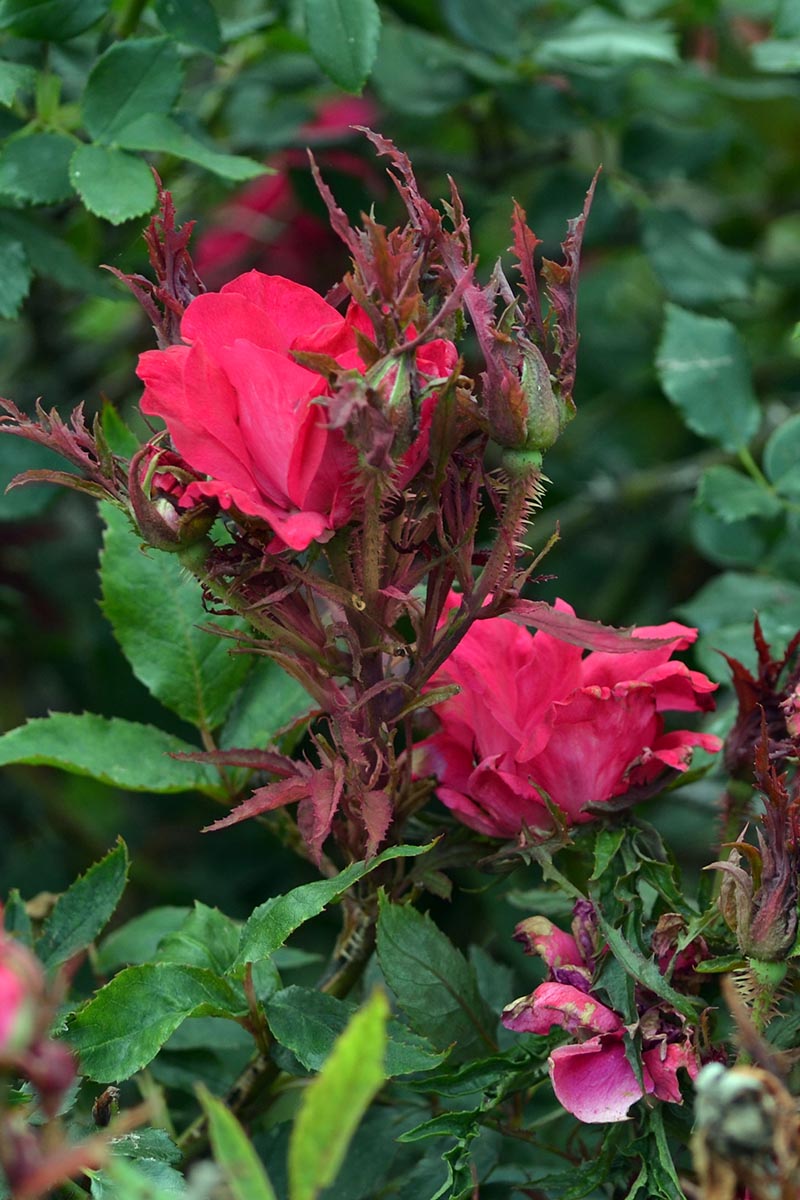
You'll notice this disease, which is spread by a virus-carrying mite, when you see the telltale bizarrely red growth of the plant.
Other early symptoms include deformed and brittle leaves with yellow and red pigmentation.
As the disease progresses, the rose develops smaller leaves and vibrant red shoots.
You'll also notice a dramatic increase in the number of thorns on the stems of your roses.
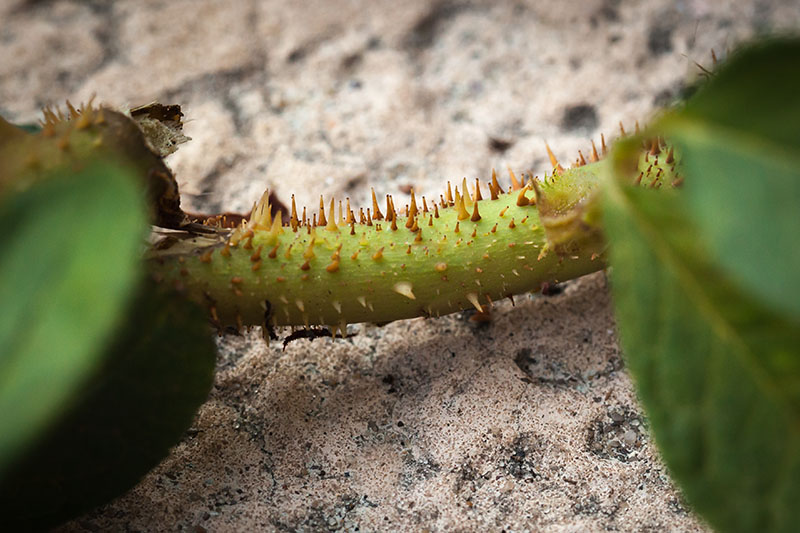
They will come to look like something more akin to a wild bramble than your favorite rose.
This disease spreads throughout the summer as the mites travel on the wind and infect new plants, laying eggs over a 30-day period.
Handling Rose Rosette
Rose rosette tends to infect wild roses far more readily than cultivated ones, but anything in the genus Rosa is susceptible.
It's recommended that you plant your roses as far away from wild roses as you can, to avoid transmission.
Prune your roses hard each year (I prune mine on the first decent days of early spring), cutting back as much as 70% of last year's growth.
This helps remove any overwintering mites and potentially infected tissue.
You can also apply insecticidal soap, but be warned that these chemicals kill almost any insect they come into contact with, including natural predators that feed on the mites.
If you've got a plant that is infected with rose rosette disease, you only have one real option for control: destroy the plant and burn it, or place it into a plastic bag and dump it with the garbage.
I'd recommend bagging the plant before removing it, to prevent spreading the mites as you carry it around the yard.
Source: https://gardenerspath.com/how-to/disease-and-pests/common-rose-diseases/
0 Response to "Leaves on My Knockout Roses Look Funny"
Post a Comment